A look at Survival and Preparedness, Firearms, Ham Radio, German Shepherds, Photography and other related stuff! 73 Later, ZombieAxe :-)

Followers

Tuesday, December 23, 2008

Ramblings on the S&W 325 PD revolver...

325 pd right side

I love semi autos and my favorite caliber is the venerable .45 ACP.

Sure I like the capacity of the wonder nines and if it shoots a projectile, I like it.

Revolvers are nice but I have not owned many. So after getting really anal about chasing my brass from the autos, I looked into the S&W 25,625,325 series of revolver. I wanted something light weight so the 325 PD fit the bill. Thunder Ranch has partenered with S&W to make the Nightwatch but I just don't like snub nosed revolver. I consider the 4" barrelled revolver the minimum for a good utility gun. My local dealer ask his supplier and they said they had one in stock and I had them ship it out.

325 pd left side

It has some nice wood grips as well as the the rubber grips it now wears. I'd plan on adding some Crimson Trace laser grips (I prefer Lasermax for semi-autos) in the future.

Since the .45 ACP does not have a rim, it requires the use of a moon clip to be able to extract spent cases. Think a speed loader that you just drop in six fresh catridges! I think you can also use the .45 auto rim catridge but to me it is a mute point as I am sticking to the .45 ACP.

If you are gonna use it you better lay in a good supply of moon clips and they are cheap enough to stack deep.

325 pd rear

The cylinder is made from titanium and the frame is made from S&W Scandium metal, only the internals and a metal insert in the barrel are made from steel! Very light weight buts recoil is not severe. I wouldn't want to shoot the .357 or .44 mag version a lot :eek: Weighs roughly the same loaded as a Glock 36 and is just as handy.

The sights are of the high-viz front size variety and are very easy to pick up. As all S&W revolvers it is nicely done and is accurate.

Just need some leather for it, might place an order with Kramer to get one of their excellent horse hide leather holsters. Good stuff!

So now when the mighty .45 roars on the ZA homestead, the ZA doesn't roar because he lost his BRASS. It happens when you shoot and move in a fescue field!

Thanks for reading :)

Later,
ZA

Sunday, December 21, 2008

Ramblings on my working blades...

Photobucket
Photobucket

From TOP to BOTTOM:

RTAK by WKC Newt Livesay
Woodsman's Pal
Buck BUCKMASTER
Buck Intrepid commercial copy of the Kit Carson design
Cold Steel Recon Tanto
Gerber LMF II

Photobucket

RTAK (Randall Training and Adventure Knife) made FIRST by Newt Livesay of the Wicked Knife Company. I read an article in ASG (American Survival Guide) and was really impressed with it. I took me about a month to get it shipped and I suspect that is why eventually RTAK production went to Ontario Knife to meet demand. I have both but IMHO the Origional slightly edges (pun intended) out the Ontario version. Currently the ONLY semi custom blade I own. This blade is a awesome chopper. It easily and quickly can help you blaze a trail, clear brush, construct a shelter, split wood and defend yourself if need be!

Photobucket

Next up is the Woodsman's Pal. This was designed in WWII and I even think there is an technique for using it as weapon. I found a local source that carried these for $35 (at the time) so thought I'd try one. I was impressed. It equally chopped wood well and functioned as machete. The brush hook will easily handle small brush, saw briars, and blackberry bushes with ease. I prefer to use this over a axe or hatchet, for to me, it seems much safer.

I use this also to split wood by driving it through the wood by striking the tip with a handy sized chunk of wood. I actually use this on a test for the RTAK's, Recon Tanto and WP to make sure my knives are up to my needs!

The example shown above is my PRISTINE one as it has never been used but resides in my work bag (I have bush axes, axes and pruning saws on my truck and use them because I have to chop poison vines with them, mine is for survival use).

The one on my 4 wheeler has seen a hard life, but other than the wood handles graying, and some shiny spots on the blade, it is good to go!

Bottom line, if I had to have only one blade to survive in the wild, give me a Woodman's pal!

Photobucket

Next up is the Buck BUCKMASTER. Back in the mid to late 80's when the hollow handled survival knife craze was going on, this was the pinnacle of mass produced knives. I later came to find out, that this design was vastly inferior to full tang designs. HOWEVER next to a Chris Reeve hollow handled knife this blade is the only hollowed handle design I would carry.

At the time I liked the idea of having an all in one survival kit in the handle of your knife. I mean it was a cool concept, but blade and handle seperation is a bad thing! Better to have a superior blade and a survival kit in YOUR POCKET!

The BUCKMASTER is a big piece of steel. The handle has agressive checkering and well IMHO is one of the prettiest knives of the 80's.

Unfortunately I lost one of the spikes while on a camping trip. I suppose the idea is to use this knife as a grappling hook or such in the sheath... I don't like that idea but it is there if I need such. The screw off handle has a place to attach a rope or carabiner as well.

Great knife, but it was a "I wanted one when I was younger" thing. It resides in one of my vehicle kits these days as a backup...

Photobucket

Photobucket
This is the Buck Intrepid. This blade was designed by Kit Carson. The knife is very well made and has a full tang. The handles are removable for cleaning zombie blood or when immersed in salt water.

I prefer a straight edge knife to serrated one because it is easier to sharpen. I do however think the combo blades with partial straight and serrated edges are great. I think serrated blades really shine in cutting nylon, rope and similar materials. So got the best of both worlds there!

I also like the chisel edge on top of the blade as this knife has lots of cutting area, which is a nice option as well

This blade has a Tanto point which is also a plus in my book as it makes the tip very strong as well as great piercing characteristics. They also made this blade with a chisel tip, but it was not for me

This knife resides in my work bag in case I run into a survival situation @ work and need a great blade to get me out of a survival situation.

Photobucket

Above is the Cold Steel RECON Tanto. This blade wins in the economy department. As you can see from the pics, I have used this knife, lovingly but HARD! I love this blade and can not say enough good things about it!

Funny thing is a group of three of us went on a camping trip. When we pulled out our knives, EVERYONE had a RCON Tanto. This said a lot being that we were from varied backgrounds and had come to the same answer in a fixed blade knife!

One of the fellars showed me a technique to split wood with the RECON Tanto, that when I first saw it, I honestly thought he was gonna break it. I mentioned it above about striking the tip to drive the Tanto through the wood with a baseball bat sized piece of wood!

I use the RECON Tanto to split pieces of wood for kindling just like I described above and it works great! The Woodman's Pal beats the RT in this method mainly because the WP is a bigger piece of metal!

Overall one of the most affordable, durable and SHARP (holds and edge and is easy to sharpen) knives I have ever owned/used.

I don't know if the RECON Tanto's are still made in the USA, but if I had a choice, I'd go American, this one is.

Photobucket

Finally we get to the last blade and the one that has the honor of residing in my BOB/GHB, the Gerber LMF II. I hated Gerber Knives in the late 80's and early 90's. The reason is that the blades broke to easily. I am hard on a knife, so either it breaks and I hate it, or it doesn't and I love it.

So even though Gerbers were not cheap, I considered them POS blades (except the origional LMF) and after a bad experience I wrote them off.

A friend of mine is a Gerber freak and I noticed ,that to me, the blades seemed better made. So when the LMF II came out I was impressed. Impressed enough to lift my ban on Gerber blades.

I like the combo edge (as I talked about above) and I find that the shorter overall length makes this a practical knife that does small and large chores easy. IMHO this is a perfect length for a tool knife. It does everything well except for the chopping power of the larger blades.

The blade and hammer pommel are electrically isolated so if you need to you could chop a live wire (one sniper in Iraq used this knife to do such a thing). Not plan A, but a plan none the less!

The steel is easy to sharpen and it is extremely well ballanced.

Overall it has passed all my tests and it reminds me of an updated version of the 'USAF pilot survival knife' expecially in its size and handiness.

So there you have it, my fixed blade arsenal. Thanks for reading!

Monday, December 8, 2008

Ramblings on keeping electronics working in cold weather...

I just got back from a parade up here in the mountains of NC my little was in. It was rather chilly, overcast, 5mph breeze, and 30F. I know for most of you in the Northern part of the country this is considered a heat wave, but for us in the south when that is the HIGH, that is 'dry' blizzard conditions

So when standing on a street waiting for your little angel to hurry the heck up (the float she was on was 3rd from the last ) your camera batteries are even less cold tolerant than you... So you don't want to miss that all important 15 secs of "Hey Daddy!!!!!" you were capturing for posterity with a cold 'graveyard dead' camera battery.

There are actually 2 solutions to this problem but are dependent on the battery type.

1. If your device is powered by AA's then simply switch them out to Energizers Lithium AA batteries. These batteries work very well in the cold. ALL my gear in my BOB/GHB has lithiums in them (if available), because these don't leak like alkalines, and their shelf life is greater! Only downside is MORE expensive, but what is more expensive the cost of the batteries??? Or the item being useless when you need it???

2. Hot Hands 2 hand warmers...I came up with this technique on a camping trip in the Natahala National Forest. Our ham radios were powered by rechargeable NiMh batteries, but when subjected to below freezing temps, the batteries couldn't take it and they would shut down. Cold and rechargeable batteries don't mix in my experience, so some way was need to keep the battery warm so we could use the darn things! We had a crap load of hot hand hand warmers so stuck these in the radio pouches to keep our radios working. They work EXTREMELY well at this and we got through the trip. No fumes and no fuel or mess. Thin enough to fit in pouches or be temporarily taped/rubber banded to the back of cameras,camcorders, GPS units, ham radios, etc. They also do not get too hot (130F) but you should make sure that your electronics don't super heat by monitoring them while using the hot hands.

Just something you need to consider when working outside in the cold and expect your electronics to do the same...

That is what I used to get the video camera to record those 'precious moments' today!

73

later,
ZA

Zombie Axe's "Check Six Ring"

ZA's Check Six Ring in action

Back in my early school days I read an interesting book. It took place in the late 1800's but I don't remember much of anything other than the central character was young boy and somehow befriended a benevolent river boat gambler. The gambler had one of the coolest things to check behind his back while playing card so NO bad guys could get the jump on him. The cool thing was a "highly mirror polished ring" so he could see what was going on without turning around. I reckon he had to keep an eye on the players so they wouldn't cheat and keep an eye on his rear (called "check six" by military folks) so he wouldn't get jumped! I always thought the idea of a mirror ring was very neat and a worthwhile idea.

In my high school days i had a cool pair of sunglasses which were mirrored on the inside edges to allow you to "check six". I loved those things and the reflective ring became a distant memory.

ZA's Check Six Ring Model 1

Enter to a few weeks ago, I discovered Kip Kay's awesome HOW TO videos and REALLY got interested when he showed this little 1"x1" mirrors that people use in craft projectsm
, but was using them to bounce a laser beam for a home brewed security system. I thought, "wow next time I locate some of those I will hafta get some!"

Now flash forward to today. I was checking out a VERY good dollar store called "Mighty Dollar". They had bags of these little mirrors for , you guessed it, a dollar. I bought several bags for projects I have been wanting to do and lots of other goodies :)

When I got home, I thought about the gamblers ring and boy now I got the mirror, how can I make it handy???

ZA's Check Six Ring factory

I went messing around in the tool room and found some copper fittings from a plumbing job I did years ago... and it dawned on me, that I was a pretty good solderer back in the copper pipe days :)

ZA's Check Six Ring 1&2

A 3/4" coupling made a good ring after cutting a piece off. A 1/2" coupling cut into, pulled apart, pounded flat made a good base to support the mirror on the copper ring. All I had to do was solder the two together. After a little engineering and some blow torch time, my little project came together just fine.

I made 1, then made another using a more streamlined approach. My wife was astounded I could make jewelry (I am in trouble now ;) )and thought it was a cool idea.

In the pics I am using a piece of tape to hold the mirrors onto the copper plate. The one I will be testing out has it attached with an adhesive silicone glue. I am planning on painting these in a "skin tone" color to blend in with the hand better.

Ok Ok, you ask, "WTF is that for???????????????????????????" Fair enough, the 'ZA Check Six Ring' is to discreetly observe WTF is going on behind you. Observe things overhead while looking down. Place on a table to observe whatever.

ZA's Check Six Ring model 2

I really do not know if there is a market for this or not, or heck, even a practical use for it. A fictional river boat gambler, thought something similar was a good idea, so maybe there is a use??? It's a cool idea if I do so so myself :)

Thanks for reading!!!

Later,
ZA

Thursday, November 27, 2008

Ramblings on gates and limiting access...

Limiting access is a great way to secure things. Many criminals simply drive around the neighborhood and look for an easy mark. I have studied break ins in my AO and have noticed that the places that limit the getaway car from being able to pull up to the front door and load up the goodies were usually safe. I have advised neighbors to do such and some have taken my advice, some have ignored it and others only understood 'half' of what I recommended. Electric gates are nice but I will not be covering them in this article.

To take retreat security seriously you need to use the ONION method. IOW you need many layers. A gate or a fence is only ONE layer in a well thought out security plan.

IMHO a gate is one of the first PHYSICAL barriers a potential threat could come up against. Gates and fences are designed to keep something in, something out, or BOTH.


One family in the neighborhood lost a loved one a few years back. She was an elderly lady who knew everything that was going on which was a deterent in itself. While she was alive she had many visitors so a gate was not an option for her. However, when she passed away the family wished to limit access to anyone wanting to 'snoop around' because there were no longer EYES watching the place.

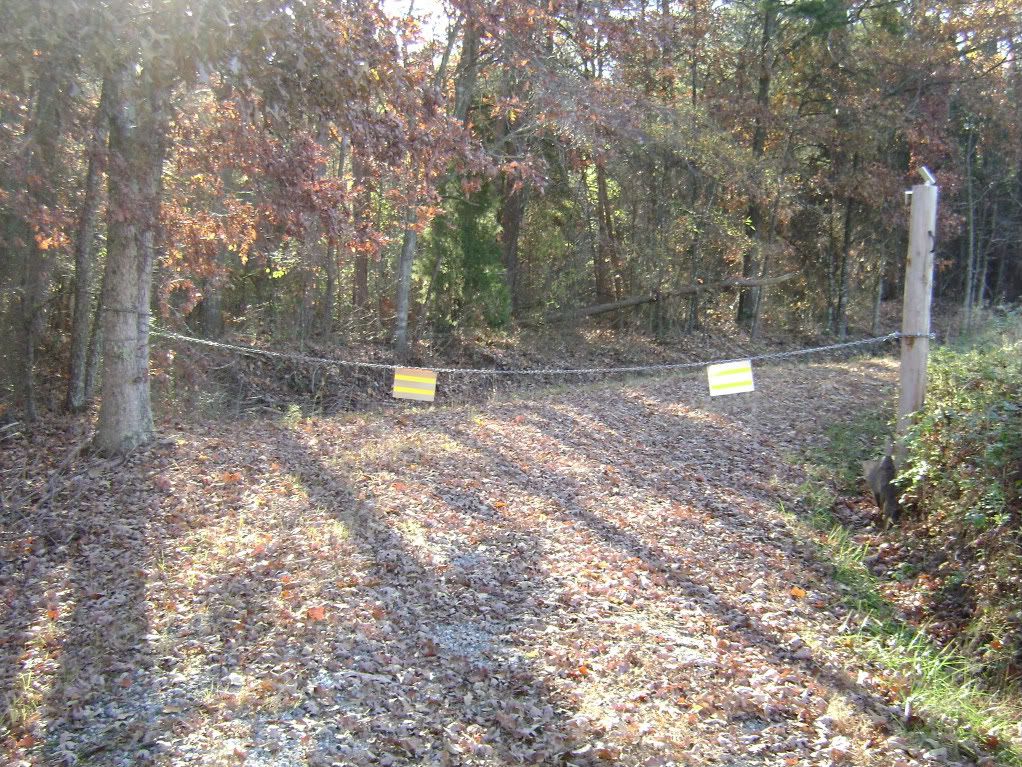
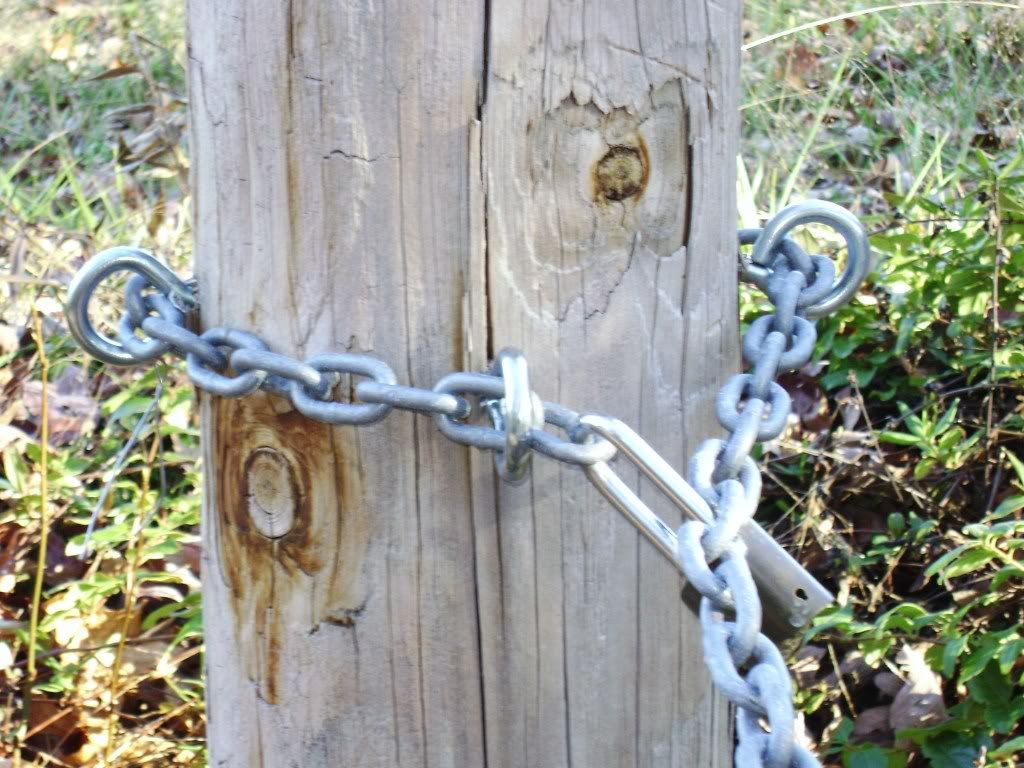
A large pennant gate (triangular) was thought to be a solution but costs over $600 to fabricate. I offered them a simple solution of the chain gate. Basically 40' of 3/8ths chain secured between two posts or trees at a natural choke point. You have to be careful with using a too heavy chain or you will have to be superman to lock it.


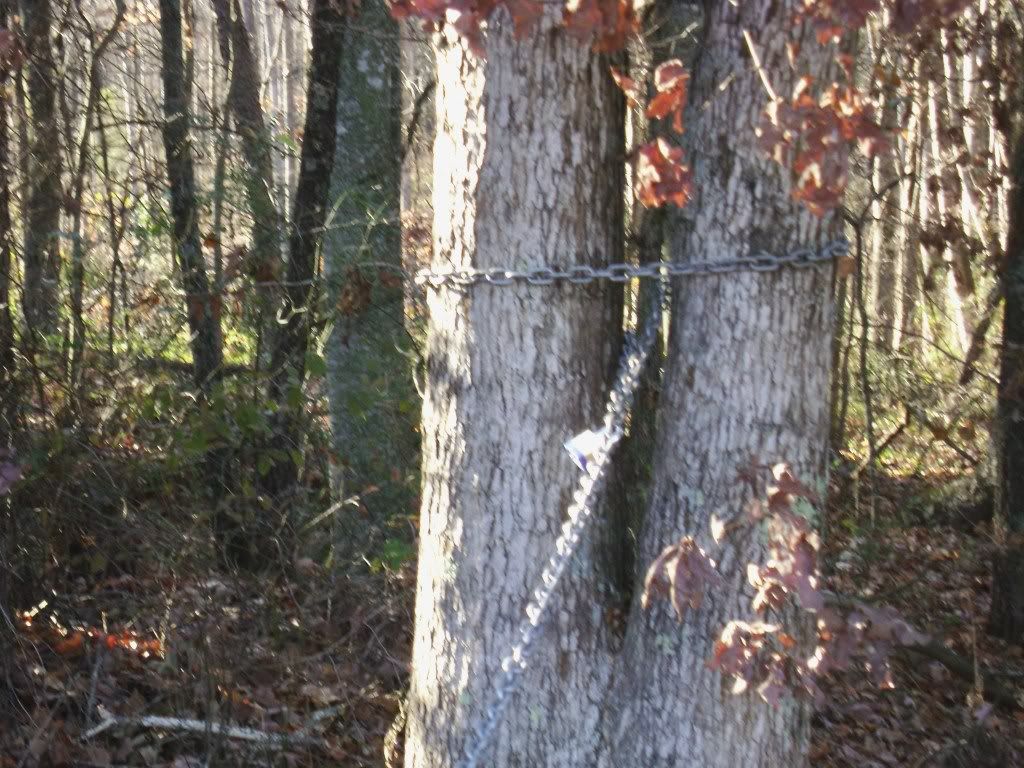
Basically we secured a light pole 3' down in about 160 lbs of concrete. Setting the pole was tricky as we had to dig into a bank to place the pole so we wouldn't impede the flow of runoff water in the side ditches. Instead of opting for a second pole we used a handy oak tree to secure the chain. The oak is where the family placed a keyed padlock to get in and out as needed. On the light pole 4 large screw eyes were place so the chain could go through and not be 'walked up and off of' the pole. The chain needed to also be secured back upon itself and it only made sense to use a lock to do so. This lock is one of the combination locks that the combination lock can be changed at will, so you can let service folks in and then change the combination, thus giving them temporary access. Also a solar powered halogen motion detector night light is placed strategically to BLIND the driver of a car or truck at night. The light does not blind the trespasser into hitting the gate, but to disorient them and give the family time to react. This also works as a visual burglar alarm. So far there have been no vehicles or break-ins at this property as it is a PITA to back out of there and this gate removed access to the cul de sac that folks used before. If you make things hard, folks will not even bother. Criminals like EASY targets and most 'case' the location and even visit it before they ever take anything...

Photobucket

One of the folks in my neighborhood before I moved to my current AO had some crooks break into their home after they established a pattern that the bad guys could set a watch to! One day as the homeowner left, 10 minutes later, the bad guys broke in and pillaged the house. This house had an alarm system but the crooks knew they had a few minutes to smash and grab. They backed the getaway car up to the door, kicked in the door, and grabbed the good stuff (as per elderly next door neighbor's eyewitness testimony). The homeowner invited me over to see the damage.

I tell you, this made a BIG IMPRESSION on me and I designed the security of home with the lessons learned from this neighbor’s incident. The neighbor upgraded his door and security and installed a gate. The gate will NOT stop any vehicle as one night a friend came by and pulled the posts to the ground by driving through this gate with a BMW. The gate or cable across the driveway suffered more damage than the BMW:eek: It is VERY effective for stopping friends knocking on your door though, especially in the rain!!! So if you place a gate, design it to stop whatever you put it up for or at least go down FIGHTING!!!


When I got a hankering to write this up, I decided I needed some pictures. Most of these were taken in fairly rural areas within a few miles of each other. A lot of my ideas to limit access came from ones similar to the ones below.

Photobucket

In placing an access limiting device, you need to first decide what you intend to stop. Cars, trucks, four wheelers, motorcycles, people and animals all require different things to stop them. A gate that works great to limit trucks may not work well for motorcycles.

Most gates unless they are attached to a fence are designed to stop vehicles. A gate will limit access until it is unlocked to allow someone to drive through. A lot of times you cannot find the PERFECT choke point to place a gate but a fence isn't what you want either. To limit vehicles you place posts 3 foot or higher (spaced so a vehicle cannot pass between) so one cannot simply drive around but can still walk to the trail.

Photobucket
Photobucket

Another idea is a variation of this method is to place posts further apart and string a thick cable between as to prevent vehicles from driving between the widely spaced posts.

Photobucket
Photobucket

Using natural 'choke points' such as spaces between trees in the forest, buildings, large rocks, hills, etc. can be the EASY way to secure your road.

If one can wait long enough, you can simply plant trees or bushes that will grow INTO a natural barrier.

Photobucket

Some gates can be fabricated from steel and nothing short of a tank can defeat them. Make sure your gate is your weakest point, or folks wishing to compromise your defenses will simply BYPASS and go for the EASIER point of entry.

Photobucket
Photobucket
Drainage Ditches, creeks, streams, and rivers can provide a good barrier, especially if they are deep enough. You can also add trees, fences, rocks and other barriers to increase the potential for success! Just add a gate at the bridge or culvert and you are good to go!

There are lots of other methods for homestead/retreat security but stopping them from coming down your driveway is one of the first steps. I think everyone should have a gate if you have the property to do it.

Also keep in mind that having to get out of your vehicle WTSHTF is a perfect AMBUSH point for the bad guys. If you have ever read FerFAL's blog (www.ferfal.blogspot.com) on surviving the conditions in Argentina, you know one of the main methods of ambush used by the bad guys is getting you when you leave your home. A gate can make you vulnerable as well. Better have someone watching your six at home ready to unleash havoc on your enemies. So design your gate where you or someone else can cover it if things go bad!

73
later,
ZA

Disclaimer and Copyright Notice

The information presented in this blog are things I know how to do and have training for. To duplicate any information or techniques within is solely at the readers risk and ZombieAxe, ZombieAxe's Ramblings or Google shall not be liable for any advice and information posted within that results in damage/loss of property, injury, loss of limb, or death. By reading this blog you, your family, your heirs and even folks that have not been born yet, have entered into an electronic binding contract to not hold any entity liable (especially ME!) but YOURSELF for any damage/loss of property, injury, loss of limb, or death from reading this blog.

FTC Discalimer,

To the Federal Trade Commison:Zombie Axe/Zombie Axe's Ramblings is not being paid by anyone, bribed with free gear to test, or offered free trips to exotic locals to 'give good press' for a product. All products were personally purchased by myself with the intention of using them for myself and any thing I plug on this blog is an item I recommend because I HAVE TESTED IT and found it worthy of mention. Go after those travel agents who get the free cruises and leave us legit non commercial bloggers alone.

All material is copyright 2009 Zombie Axe and no material may be used without credit to the author in part or whole.

Sincerely
Zombie Axe